

How do you make ube pancakes step by step?
Fluffy, vibrant, and packed with a naturally sweet flavour, ube pancakes are taking Canadian breakfast tables by storm. Discover how to make them perfectly every time, using premium ube powder.
Before you get started, you can now explore our full range of UBE products available across Canada by clicking here.

What Is Ube and Why Is It Taking Over Breakfast?
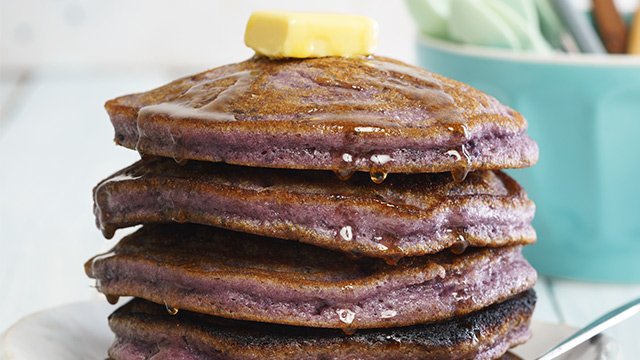
If you have not yet encountered ube, prepare to fall in love with one of the most exciting ingredients of the moment. Ube (pronounced ooh-beh) is a purple yam native to the Philippines, celebrated for its striking violet colour and its unique flavour profile, which combines notes of vanilla, coconut, and sweet potato into something truly unforgettable.
Unlike artificial colourings, the gorgeous purple hue you see in ube pancakes comes entirely from natural pigments called anthocyanins, the same antioxidant-rich compounds found in blueberries and red cabbage. In other words, your breakfast gets to be both beautiful and nourishing. 🌿
Ube powder is the most convenient and consistent way to bring this ingredient into your kitchen. It preserves all the natural colour, flavour, and nutritional qualities of fresh ube, without any of the prep work. Whether you are an experienced home cook or just beginning your culinary adventures, ube powder makes it remarkably easy to create stunning results.
Why Make Ube Pancakes?
Before diving into the step-by-step process, it is worth understanding what makes ube pancakes so special compared to a classic stack.
Visually stunning: The deep purple colour makes every plate look like it belongs in a high-end brunch café. If you enjoy sharing your meals on social media, ube pancakes will not disappoint. 📸
Naturally flavourful: The earthy sweetness of ube means you need far less added sugar than in traditional pancake recipes. The flavour is rich and complex, not one-dimensional.
Nutritionally interesting: Purple yam contains dietary fibre, potassium, and vitamin C. While pancakes are certainly a treat, choosing ube powder adds a layer of genuine nutritional value to your morning routine.
Versatile and crowd-pleasing: From weekend brunches to special celebrations, ube pancakes impress both children and adults. They work beautifully for Filipino-inspired menus, themed parties, or simply when you want to do something extraordinary on a Tuesday morning.
| Discover our Ube Lover Kit - Organic Ube® |

What You Will Need: Ingredients for Ube Pancakes
Makes approximately 8 to 10 medium pancakes
Dry Ingredients
- 1 ½ cups all-purpose flour (or oat flour for a heartier texture)
- 2 tablespoons ube powder 💜
- 2 tablespoons granulated sugar
- 2 teaspoons baking powder
- ½ teaspoon baking soda
- ¼ teaspoon salt
Wet Ingredients
- 1 cup buttermilk (or regular milk with 1 tablespoon of lemon juice added and left to sit for 5 minutes)
- 2 large eggs
- 3 tablespoons melted butter or neutral oil
- 1 teaspoon pure vanilla extract
- 1 teaspoon ube extract (optional, but it intensifies both colour and flavour beautifully)
For Serving
- Maple syrup 🍁
- Fresh fruit (mango, strawberries, or blueberries pair wonderfully)
- Whipped cream or coconut cream
- A light dusting of powdered sugar
A note on ube powder quality: The colour and depth of flavour in your pancakes will depend entirely on the quality of the ube powder you use. Opt for a premium, finely milled ube powder with no artificial additives. Our ube powder is sourced with care and delivers that deep, authentic purple every single time.
How Do You Make Ube Pancakes Step by Step?
Step 1: Prepare Your Workstation 🍳
Set out all your ingredients before you begin. This is called mise en place in professional kitchens, and it truly makes the cooking process more enjoyable and less stressful. Have a large mixing bowl, a smaller bowl for wet ingredients, a whisk, a non-stick pan or griddle, and a spatula ready.
Bring your eggs and buttermilk to room temperature if possible. Cold dairy can cause the batter to seize slightly and results in less fluffy pancakes.
Step 2: Mix Your Dry Ingredients
In your large mixing bowl, combine the all-purpose flour, ube powder, sugar, baking powder, baking soda, and salt. Whisk them together thoroughly until the ube powder is evenly distributed throughout the flour mixture. You should see a consistent lavender-grey colour at this stage.
This step is more important than it might seem. Uneven distribution of baking powder can lead to inconsistent rising, and clumps of ube powder can leave you with streaky pancakes rather than that gorgeous uniform purple.
Step 3: Combine Your Wet Ingredients
In a separate bowl, whisk together the buttermilk, eggs, melted butter, vanilla extract, and ube extract if you are using it. Whisk until the mixture is smooth and well-combined.
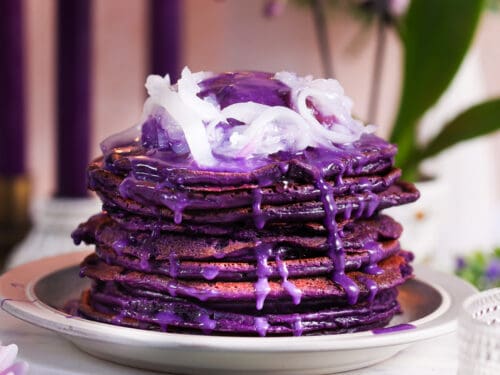
If you are using the homemade buttermilk method (regular milk with lemon juice), make sure you have allowed it to rest for at least 5 minutes before adding it to the other wet ingredients. You will notice it curdles slightly, which is exactly what you want. This acidity reacts with the baking soda to create extra lift.
Step 4: Combine Wet and Dry Ingredients 💜
Pour the wet ingredients into the bowl of dry ingredients. Using a spatula or wooden spoon, stir gently until just combined. This is the most critical technique in pancake-making: do not overmix.
You want to see a few streaks of flour still visible in the batter. Overmixing develops gluten, which leads to dense, rubbery pancakes instead of the light and fluffy result you are after. A lumpy batter is a sign of a good pancake cook.
Let the batter rest for 5 minutes while your pan heats up. This resting period allows the leavening agents to activate and gives you a noticeably better texture.
Step 5: Heat Your Pan Properly
Place a non-stick pan or griddle over medium heat. Add a small knob of butter or a light drizzle of oil and let it melt and coat the surface. The pan is ready when a small drop of water flicked onto the surface sizzles and evaporates immediately.
Getting the temperature right is essential. Too hot and the outside of your pancakes will char before the centre cooks through. Too cool and they will spread too thin and take on a flat, dense texture. Medium heat is your best friend here.
Step 6: Cook Your Ube Pancakes 🥞
| Discover our Ube Electric Mixer |

Pour approximately ¼ cup of batter per pancake onto the heated pan. Do not spread the batter. Simply pour and allow it to settle naturally into a round shape.
Watch for bubbles forming on the surface of the pancake, this is your cue to flip. It typically takes about 2 to 3 minutes on the first side. Once you see bubbles across most of the surface and the edges look set, slide your spatula underneath confidently and flip in one smooth motion.
Cook for an additional 1 to 2 minutes on the second side. Resist the urge to press down on the pancake with your spatula. This deflates all the beautiful air bubbles you have worked to create.
Step 7: Keep Warm and Repeat
Transfer cooked pancakes to a baking sheet in an oven set to the lowest possible temperature (around 200°F / 93°C) to keep them warm while you cook the remaining batter. This ensures everyone at the table eats at the same time, and warm pancakes absorb maple syrup so much better.
Continue cooking with the remaining batter, adding a tiny amount of butter or oil between each batch as needed.
Step 8: Plate and Garnish Beautifully ✨
Stack your ube pancakes tall and proud. The deep purple colour of the stack is truly a sight to behold. Drizzle generously with Canadian maple syrup, add a dollop of whipped cream or coconut cream, and scatter fresh fruit around the plate.
A light dusting of powdered sugar adds an elegant finishing touch that photographs beautifully.
Tips for Perfect Ube Pancakes Every Time
Do not skip the rest period. Even 5 minutes of resting time makes a measurable difference to the final texture of your pancakes. If you have time, you can even prepare the batter the night before and refrigerate it overnight.
Use a consistent pour. A ¼ cup measuring cup used as a ladle gives you uniform pancakes that cook at the same rate, making it much easier to manage multiple pancakes at once.
Adjust colour to your preference. If you want an even more vibrant purple, increase the ube powder by half a tablespoon. If you prefer a subtler shade, reduce it slightly. Ube powder gives you complete control over the intensity.
Make them dairy-free. Substitute the buttermilk with full-fat coconut milk (with a teaspoon of apple cider vinegar added) and use coconut oil instead of butter. The result is just as fluffy and takes on a lovely tropical edge that complements ube beautifully.
Try them with ube whipped cream. Mix a small amount of ube powder into heavy whipping cream before whipping. The result is a stunning, lightly purple cream that elevates your stack to something truly special.
How to Store Leftover Ube Pancakes
If you find yourself with leftover pancakes (which is rare, but possible!), allow them to cool completely before stacking them with a sheet of parchment paper between each pancake to prevent sticking. Store in an airtight container in the refrigerator for up to 3 days, or in the freezer for up to 1 month.
To reheat, simply pop them in the toaster for 1 to 2 minutes, or warm them in a dry pan over medium-low heat. They reheat beautifully and taste just as good the next morning. 🌅
Frequently Asked Questions About Ube Pancakes
Can I use ube powder instead of fresh ube?

Absolutely, and in many ways ube powder is the superior choice for baking. Fresh ube requires peeling, boiling, and mashing before use, and the moisture content can vary significantly, making it difficult to achieve consistent results. Ube powder has a stable moisture content and delivers reliable colour and flavour every time. It is also far more shelf-stable and easier to store.
How much ube powder should I use per cup of flour?
As a general guideline, 1 to 2 tablespoons of ube powder per cup of flour gives excellent colour and flavour in pancakes. You can adjust to taste depending on how vibrant you want the result to be.
Is ube naturally sweet?
Yes, ube has a naturally pleasant sweetness, which is why recipes using ube powder often require less added sugar than traditional versions. It is a subtler, more nuanced sweetness than refined sugar, which makes the overall flavour profile much more sophisticated.
Where can I buy quality ube powder in Canada?
You are in exactly the right place. Our ube powder is available right here in our Canadian online store, with fast shipping across the country. We take quality seriously, and our ube powder is finely milled, free from artificial additives, and designed to deliver stunning results in everything from pancakes to cakes, lattes, and ice cream. 🇨🇦
Ready to Make Your First Batch? 💜
Ube pancakes are more than just a breakfast. They are an experience. From the moment you mix the vibrant batter to the first bite of a warm, fluffy stack drizzled with maple syrup, there is something genuinely joyful about cooking with ube.
| Discover our Organic Ube Powder 200g (7oz) |

All you need is a bag of our premium ube powder and the simple recipe above. Whether you are cooking for yourself on a quiet Sunday morning or hosting a brunch that will leave your guests talking for weeks, ube pancakes deliver every single time.
Your Favourite UBE Products Are Here
If you’d like to learn even more about this incredible superfood, we invite you to explore the rest of our website dedicated to premium UBE products available across Canada. You can browse our organic ube powder collection to discover our best-selling items, and explore our different accessory collections for even more options.
Whether you’re looking for recipes, health benefits, or high-quality UBE ingredients, you’ll find everything you need right here and at www.organic-ube-canada.ca


